I am excited to share this installment of vintage hand-stitchery tutorials for Riley Blake Designs' Cutting Corners, using RBD's cute gingham prints!
One of the easiest ways to learn to embroider is Cross-Stitch on Gingham!

Last month's "Stitchery Primer" lesson gave some super-basic embroidery stitches to try - wish I'd thought of using gingham check prints to simplify even more! All those evenly-spaced little squares make the perfect guideline to practice getting stitches straight and even. See that tutorial HERE.

"Chicken Scratch" is another great gingham embroidery technique, perfect for using with a bit larger gingham check. If you missed that tutorial, you can see it HERE. It's very similar to cross-stitch, with just a few extra steps.

Don't you love revisiting these sweet antique/vintage techniques? I do! I made my first cross-stitch project when I was about 12 "I will greet each day with a song", it said. And I still do! Today's stitches will add a whimsical flair to our arsenal of stitches, then we'll stitch up a quick little panel for a dishtowel or apron.
Supplies:

* Gingham print ~ 1/8 yard. For this sampler, I'll be using gingham with small squares, about 1/8" in diameter. Cut off a small square to practice stitches.
* Small embroidery hoop
* Crewel embroidery needle, size 4 or 5, or other wide-eye needle
* Perle cotton or other embroidery floss (use 3 strands)
* Small snips
* Specs and a good light source. :) (Note to self)
Instructions:
Two things to keep in mind for a good cross-stitch: First, keep the stitch as square as you can. (This is why gingham is so ideal!) Second, keep all of the top stitches pointing in the same direction if possible. It just looks nicer!
1) Single X.
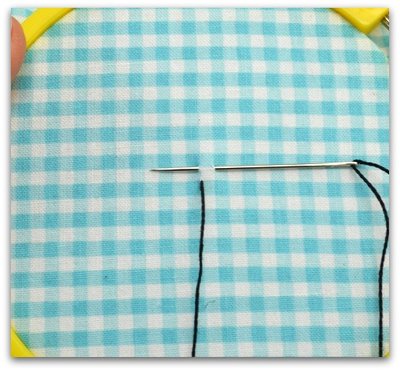
Thread your needle, tie a knot. Bring the needle out at a corner.

Insert the needle diagonally across the square from beginning point,
then straight down to exit opposite the starting point.

Take needle back down diagonally across to create the X.


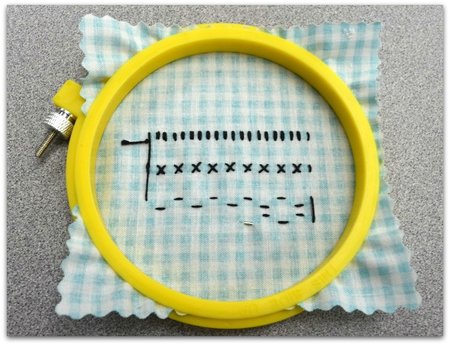
2) Rows
~Consecutive Stitches~
Begin as before, only this time, form all stitches in a row.

I like to turn my hoop to work vertically from the bottom up.
Each X is formed on the return. Note how all the crosses will be
formed going the same direction.


Spaced Stitches:
Skip a space between each stitch.


Alternate directions for each stitch.

Turn the hoop, then return in the same manner to create the design.
Note how placement of the stitches brings the focus to whatever
gingham square lines up in the center.
This is how cross-stitch can bring a lacy look to a project.

Back:

Finished Samples

~~~~~~~~~
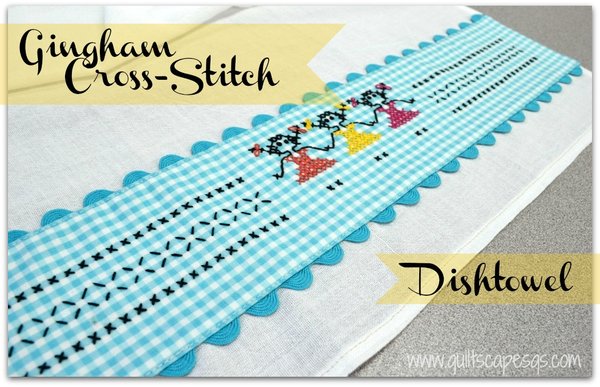
Now we're all ready to stitch our little panel and make a cute kitchen dishtowel or apron!

Supply List:

* Dishtowel measuring about 18" x 25".
* Remaining gingham check fabric, 1/8 yard (with 1/8" squares)
* Remaining gingham check fabric, 1/8 yard (with 1/8" squares)
* 1 yard medium rick-rack
* Embroidery floss in desired color(s)
* 4-inch Embroidery hoop
* 4-inch Embroidery hoop
Download the pattern guide. I happen to have triplet daughters, so I generally think in terms of three little girls... but don't worry. There's a boy pattern guide too.

1) Fussy cut a 4" x 20" strip of gingham print, making sure to cut on the lines to square up your piece.
2) Fold strip in half and crease to find the center. You'll need 13 squares across and 15 squares down to create one of the little characters.
3) Hoop the fabric, count your squares and begin stitching one or an entire row of cross-stitch kids, using your guide to show where to stitch.
Form French knots for the eyes, backstitch for the straight lines. (Refer to my Stichery Primer lesson for a refresher if needed.) If you are stitching the figures holding hands, adjust the pattern to overlap. You may have to stitch an individual X sometimes, just to get from side to side, especially on the girl's hair.
**NOTE**You may also wish to back your stitchery with a piece of muslin or flannel to help prevent knots or loose threads from showing through.
4) Stitch any combination of the cross-stitch techniques from today's lesson or use other stitches to decorate and fill in a strip out to the edges of the panel.
5) PRESS long edges over 1/4".
6) Use a GLUE-STICK to center and adhere rick-rack to the long folded edges.

7) Center and pin panel to the dishtowel, about 2" above the hem, tucking the sides to align with the dishtowel edge.
**NOTE** If you are making your panel into an apron, you can still use the dishtowel. Just turn the panel around so it's at the top, cut out arm curves, cover with bias tape, form a neck loop and add ties. Here's a pattern if you need one: Dishtowel Apron.

8) EDGE-STITCH panel to dishtowel. I love to use my edge-joining foot with a center guide; I move the needle over to the left for a perfectly even stitch. Pivot at the corners and overlap the beginning stitches.

9) Hang over the cupboard or oven door handle. Cutie, patootie!

Thanks for coming to visit Quiltscapes! Hope you enjoy the free cross-stitch kids pattern. I've been giggling at these cute little teenies all day. I kinda miss dressing my girls in the same outfit in three different colors. But they told me to stop doing that. About 18 years ago. :)


September 02nd, 2014 at 11:16 a.m.
September 02nd, 2014 at 7:28 p.m.
September 03rd, 2014 at 3:13 a.m.
September 06th, 2014 at 8:47 p.m.